- Published on, Time to read
- 🕒 12 min read
Setting up a CI/CD for React Native project with Fastlane

Introduction
So, you have a React Native project and you want to automate the deployment process.
You've probably heard about Fastlane, a tool that helps to automate the deployment process for mobile apps, and maybe you've even tried it. But failed a comple of times and gave up reading the documentation.
So, take a deep breath, brew your favorite coffee or tea. I have a recipe for you.
Prepare environment
I am working on MacBook, so the following steps are related to MacOS.
First of all, let's check if our system is ready for the Fastlane. Install the Xcode Command Line Tools by running the following command in the terminal:
xcode-select --install
you may see an "error" stating that the command line tools are already installed. That's fine.
Now, we must check which version of Ruby we have installed. Fastlane requires Ruby v2.5.0 or above (but below v3). You can check the version by running:
ruby -v
It's almost certain, that you have version 2.7.2p137 which is the latest stable version at the time of writing this article. If you have any other version I recommend using rvm to manage Ruby versions. It's is similar to nvm for Node.js so might look familiar to you.
And the last step is to install Bundler (a package manager for Ruby like npm for Node.js). You can do it by running:
gem install bundler
Setup iOS app
Prepare iOS app
Go to your iOS project directory
cd ios
and create a new file called Gemfile
touch Gemfile
with the following content:
source "https://rubygems.org"

gem "fastlane"
run bundle update and add Gemfile and Gemfile.lock to your version control system (e.g. git).
Prepare Fastlane for iOS
In same directory initiate Fastlane by running:
bundle exec fastlane init
You will see the following output:
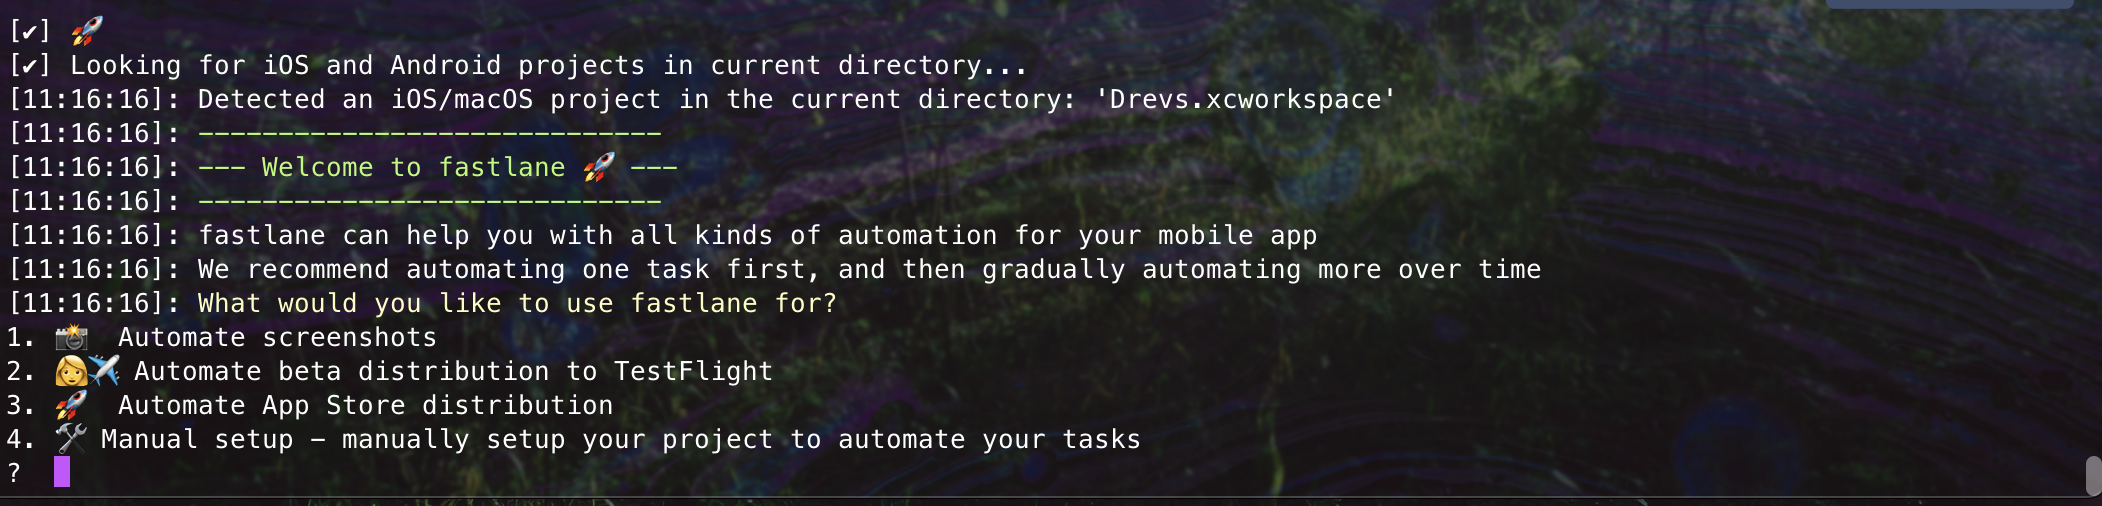
Select option 2 (enter 2 in prompt and hit Enter), because we are willing to setup a TestFlight deployments.
After that, you will be asked to provide your Apple ID and password. You can also provide a two-factor authentication code if you have it enabled. Read carefully the output and follow the instructions. Fastlane will create ios/fastlane directory with two files Appfile and Fastfile. Commit these files to your version control system, we will come back to them later.
Prepare App Signing
In order to distribure your app to the Apple App Store, you need to have a valid certificate and provisioning profiles. Fastlane can help us and our team to manage them automatically.
First of all revoke all existing provisioning profiles related to this app from Apple Developer account. Then run the following command:
bundle exec fastlane match init
And follow the prompt. I will use AWS S3 bucket to store the certificates and profiles, but you can choose the option that is the most convenient for you. The new file Matchfile will be created in the ios/fastlane directory. Commit this file to your version control system.
Now create an App-Specific Password for the Apple Account you use to sign in into Apple Developer portal at Apple Account and store the key in some secure place. You wount be able to see it again.
Since I am using S3 bucket to store the certificates and profiles, I created a new bucket at AWS console with no public access, secured and encrypted. After that I created a user (at IAM) with read/write permissions to this bucket only. It's policy looks as following:
{
  "Version": "2012-10-17",
  "Statement": [
    {
      "Sid": "VisualEditor0",
      "Effect": "Allow",
      "Action": [
        "s3:PutObject",
        "s3:GetObject",
        "s3:GetObjectAttributes",
        "s3:ListBucket",
        "s3:DeleteObject"
      ],
      "Resource": ["arn:aws:s3:::BUCKET_NAME", "arn:aws:s3:::BUCKET_NAME/*"]
    },
    {
      "Sid": "VisualEditor1",
      "Effect": "Allow",
      "Action": "s3:GetAccessPoint",
      "Resource": "*"
    }
  ]
}
And create an Access Key for this user, so I can acess the bucket from Fastlane. Do not forget to save access key and secret key in a secure place, because you won't be able to see the secret key again.
If you decided to use other provider to store your certificates and profiles, you can read docs here
The last step is to generate Apple App Store API key to have a possibility to upload an app to the App Store and TestFlight. To do this, open App Store Connect, go to Users and Access and create a new Team key. You will need Key ID, Issuer ID and Key Content. Store them in a secure place, because you won't be able to download the Key Content again.
At this point we have all the necessary credentials and objects prepared, so we can take a 5 min break, and then continue with the next steps 🧘♂️
Hide all the secrets
Since we do not want to compromise our credentials for any occasion, let's create an .env file in the ios/fastlane directory and add the following values:
LC_ALL=en_US.UTF-8
LANG=en_US.UTF-8

APP_BUNDLE_ID=< YOUR_APP_ID, e.g. com.perfectapp.for.me >
APP_APPSTORE_APPLE_ID=< App ID from App Store Connect. The app must be created >
FASTLANE_APPLE_APPLICATION_SPECIFIC_PASSWORD=<aaaa-bbbb-cccc-dddd>
APPSTORE_CONNECT_TEAM_ID=0123456789
APPLE_DEVELOPER_TEAM_ID=ABCDEFGHIJ
APPLE_DEVELOPER_ID=< your email for Apple Developer account >


S3_BUCKET=< S3 bucket name >
S3_REGION=< S3 bucket region, e.g. us-east-1 >
S3_AWS_ACCESS_KEY_ID=< s3 user access key >
S3_AWS_SECRET_ACCESS_KEY=< s3 user secret access key >

APPSTORE_API_KEY_ISSUER_ID=< isser-id-that-look-like-this >
APPSTORE_API_KEY_KEY_ID=ABCDEFGHIJ
APPSTORE_API_KEY_KEY_CONTENT="<-----BEGIN PRIVATE KEY-----\nkey_line_1\nkey_line_2\nkey_line_3\nkey_line_4\n-----END PRIVATE KEY----->"

# The following line ensures that the AWS SDK does not use SSO credentials from the AWS CLI
# if the one is configured. This is important for the AWS SDK to work correctly with the Fastlane.
AWS_SDK_CONFIG_OPT_OUT=true

# The following line disables the automatic upload of the dSYM files to Sentry
# Add this line if you are using Sentry and do not want to upload dSYM files automatically
# Useful for local builds, that will not be distributed to the App Store
SENTRY_DISABLE_AUTO_UPLOAD=true
Warning
Do not commit .env file to your version control system. Add it to .gitignore file.
But you can commit the .env.example file with the same content as .env but with empty values. It will help other developers and future self to understand which values are required.
And modify the Appfile and Matchfile to use these environment variables instead of hardcoded values. We will come back to Fastfile later.
Appfile:
app_identifier(ENV["APP_BUNDLE_ID"]) # The bundle identifier of your app
apple_id(ENV["APPLE_DEVELOPER_ID"]) # Your Apple Developer Portal username

itc_team_id(ENV["APPSTORE_CONNECT_TEAM_ID"]) # App Store Connect Team ID
team_id(ENV["APPLE_DEVELOPER_TEAM_ID"]) # Developer Portal Team ID
Matchfile:
# The docs are available on https://docs.fastlane.tools/actions/match

storage_mode("s3")
s3_bucket(ENV["S3_BUCKET"])
s3_region(ENV["S3_REGION"])
s3_access_key(ENV["S3_AWS_ACCESS_KEY_ID"])
s3_secret_access_key(ENV["S3_AWS_SECRET_ACCESS_KEY"])

type("development") # The default type, can be: appstore, adhoc, enterprise or development

app_identifier([ENV["APP_BUNDLE_ID"]])
username(ENV["APPLE_DEVELOPER_ID"]) # Your Apple Developer Portal username
team_id(ENV["APPLE_DEVELOPER_TEAM_ID"]) # Developer Portal Team ID
Are we there yet?
Finally, after all the preparations we can use match to generate all the necessary certificates and profiles for our app signing. Run the following command:
bundle exec fastlane match
You will be asked for the passphrase to encrypt/decrypt the certificates and profiles. Store it in a secure place! If you did everything correctly and according to the instructions provided, you will see the following output:
INFO All required keys, certificates and provisioning profiles are installed 🙌
Open xCode and check if the certificates and profiles are installed correctly. You can find them in the Signing & Capabilities tab of your project settings. If not, make shure that you unchecked the Automatically manage signing option and select the freshly generated profiles.
Now, lets update the Fastfile to build the app locally (for testing purposes).
default_platform(:ios)

platform :ios do
  desc "Push a new beta build to TestFlight"
  lane :beta do
    # UI.message "Setup App Store Connect API Key"
    app_store_connect_api_key(
      key_id: ENV["APPSTORE_API_KEY_KEY_ID"],
      issuer_id: ENV["APPSTORE_API_KEY_ISSUER_ID"],
      key_content: ENV["APPSTORE_API_KEY_KEY_CONTENT"],
      duration: 1200, # optional (maximum 1200)
      in_house: false # optional but may be required if using match/sigh
    )
    # UI.message "Getting the latest certificates for an iOS app"
    match(type: "appstore", readonly: true)
    # UI.message "Incrementing the build number"
    # uncomment the following line if you want to increment the build number automatically
    # increment_build_number(xcodeproj: "YOUR_WORKSPACE.xcodeproj")
    # UI.message "Building the app"
    # 🚨 ATTENTION 🚨
    # PLEASE MAKE SURE UPDATE THE YOUR_WORKSPACE and YOUR_SCHEME values according to your project settings
    # 🚨 ATTENTION 🚨
    build_app(workspace: "YOUR_WORKSPACE.xcworkspace", scheme: "YOUR_SCHEME")
  end
end
And run the following command:
bundle exec fastlane beta
After a couple of minutes, you will see the following output:
[21:33:18]: Successfully exported and compressed dSYM file
[21:33:18]: Successfully exported and signed the ipa file:
[21:33:18]: /PATH_TO_PROJECT/ios/APP_NAME.ipa

+------------------------------------------------+
|                fastlane summary                |
+------+---------------------------+-------------+
| Step | Action                    | Time (in s) |
+------+---------------------------+-------------+
| 1    | default_platform          | 0           |
| 2    | app_store_connect_api_key | 0           |
| 3    | match                     | 1           |
| 4    | build_app                 | 359         |
+------+---------------------------+-------------+

[21:33:19]: fastlane.tools just saved you 6 minutes! 🎉
It means we are ready to move to automantion with GitHub Actions 🚀
Setup CI/CD with GitHub Actions
I used to work with GitHub Actions. It's a great tool to automate the CI/CD process for your project. And provides a lot of possibitlies for free.
If its your first time with GitHub Actions, I recommend reading the official documentation.
Prepare GitHub Actions
In your project root create a folder .github/workflows and create a new file ios.yml with the following content:
name: ios-app-testflight
run-name: Build and deploy iOS app to TestFlight
env:
  LC_ALL: en_US.UTF-8
  LANG: en_US.UTF-8

permissions:
  id-token: write
  contents: read
on:
  workflow_dispatch:
  push:
    # remove `paths` if you want to run the workflow on every push or update it accordingly to your repository structure
    # I use monorepo and my mobile app is located in `apps/mobile` directory
    paths:
      - "apps/mobile/**"
    branches:
      - main
jobs:
  install:
    name: Install dependencies
    runs-on: macos-14
    steps:
      - uses: actions/checkout@v4
      - uses: ./.github/actions/setup_node
      - uses: ./.github/actions/install_with_cache
  build:
    name: Build and deploy iOS app to TestFlight
    needs: install
    runs-on: macos-14
    env:
      FASTLANE_OPT_OUT_USAGE: true
      S3_BUCKET: ${{ vars.S3_BUCKET }}
      S3_REGION: ${{ vars.S3_REGION }}
      S3_AWS_ACCESS_KEY_ID: ${{ vars.S3_AWS_ACCESS_KEY_ID }}
      S3_AWS_SECRET_ACCESS_KEY: ${{ secrets.S3_AWS_SECRET_ACCESS_KEY}}
      APP_BUNDLE_ID: ${{ vars.APP_BUNDLE_ID }}
      APP_APPSTORE_APPLE_ID: ${{ vars.APP_APPSTORE_APPLE_ID }}
      FASTLANE_APPLE_APPLICATION_SPECIFIC_PASSWORD: ${{ secrets.FASTLANE_APPLE_APPLICATION_SPECIFIC_PASSWORD}}
      APPSTORE_CONNECT_TEAM_ID: ${{ vars.APPSTORE_CONNECT_TEAM_ID }}
      APPLE_DEVELOPER_TEAM_ID: ${{ vars.APPLE_DEVELOPER_TEAM_ID}}
      APPLE_DEVELOPER_ID: ${{ secrets.APPLE_DEVELOPER_ID }}
      MATCH_PASSWORD: ${{ secrets.MATCH_PASSWORD }}
      APPSTORE_API_KEY_KEY_ID: ${{ vars.APPSTORE_API_KEY_KEY_ID }}
      APPSTORE_API_KEY_ISSUER_ID: ${{ vars.APPSTORE_API_KEY_ISSUER_ID }}
      APPSTORE_API_KEY_KEY_CONTENT: ${{ secrets.APPSTORE_API_KEY_KEY_CONTENT}}
      # add other environment variables if needed, f.e. SENTRY_AUTH_TOKEN, or API_URL etc.
    steps:
      - uses: actions/checkout@v4
      - name: Setup Node.js
        uses: actions/setup-node@60edb5dd545a775178f52524783378180af0d1f8 # version 4.0.2
        with:
          node-version: 20
          # edit `yarn` to `npm` if you use npm instead
          cache: "yarn"
      - name: Install dependencies
        uses: actions/cache@0c45773b623bea8c8e75f6c82b208c3cf94ea4f9 # version 4.0.2
        id: yarn-cache
        with:
          path: |
            node_modules
            **/node_modules
          # edit `yarn.lock` to `package-lock.json` if you use npm instead
          key: ${{ runner.os }}-node-${{ hashFiles('**/yarn.lock') }}
      - if: steps.yarn-cache.outputs.cache-hit != 'true'
        # edit `yarn install --immutable` to `npm ci` if you use npm instead
        # edit `yarn install --immutable` to `yarn install --frozen-lockfile` if you use yarn@v1
        run: yarn install --immutable
      - name: Config ruby
        uses: ruby/setup-ruby@bc2ba926aade0711935b50bcb1b9ccdb5fde2dda
        with:
          ruby-version: 2.7
          bundler-cache: true
      - name: Install gems for iOS
        if: runner.os == "macos"
        working-directory: ./ios
        shell: bash
        run: bundle install
      - name: Install pods for iOS
        if: runner.os == "macos"
        working-directory: ./ios
        shell: bash
        run: bundle exec pod install
      - name: Build and distribute iOS app
        working-directory: ./ios
        shell: bash
        run: bundle exec fastlane beta
Important
Now you must go to your GitHub repository settings and add all the variables and secrets that are used in the ios.yml file. Values are the same that we used in the .env file previously.
After that, lets update the Fastfile with the following content:
default_platform(:ios)

platform :ios do
  desc "Push a new beta build to TestFlight"
  lane :beta do
    # UI.message "Setup CI environment"
    setup_ci if ENV["CI"]
    # UI.message "Setup App Store Connect API Key"
    app_store_connect_api_key(
      key_id: ENV["APPSTORE_API_KEY_KEY_ID"],
      issuer_id: ENV["APPSTORE_API_KEY_ISSUER_ID"],
      key_content: ENV["APPSTORE_API_KEY_KEY_CONTENT"],
      duration: 1200, # optional (maximum 1200)
      in_house: false # optional but may be required if using match/sigh
    )
    # UI.message "Getting the latest certificates for an iOS app"
    match(type: "appstore", readonly: true)
    # UI.message "Incrementing the build number"
    # uncomment the following line if you want to increment the build number automatically
    # increment_build_number(xcodeproj: "YOUR_WORKSPACE.xcodeproj")
    # UI.message "Building the app"
    # 🚨 ATTENTION 🚨
    # PLEASE MAKE SURE UPDATE THE YOUR_WORKSPACE and YOUR_SCHEME values according to your project settings
    # 🚨 ATTENTION 🚨
    build_app(workspace: "YOUR_WORKSPACE.xcworkspace", scheme: "YOUR_SCHEME")
    # UI.message "Uploading the app to TestFlight"
    upload_to_testflight(
      # uncomment this line if you want to specify the TestFlight testers group to distribute the app to
      # groups: "OneMoment Team",
      # comment this line if you want to wait for the build processing (will increase the GitHub Action time and cost)
      skip_waiting_for_build_processing: true,
      apple_id: ENV["APP_APPSTORE_APPLE_ID"],
      # uncomment this line if you want to distribute the app to external testers
      # distribute_external: true,
      # update the changelog text according to your needs, but it's required for the TestFlight distribution
      changelog: "The new version of the development build. Full changelog is available in the release notes."
    )
  end
end
We are ready to push the changes to the repository and see the magic happen 🪄
So commit the changes and push them to the repository.
If you follwed the instructions, you should see the new workflow running in the Actions tab of your repository. After a couple of minutes, you will see the new build in the TestFlight.
Now every commit to main branch will build and distribute the app to the TestFlight automatically. 🚀
In the next article, I will show you how to automate the deployment to the App Store and Google Play Store.